
About this Checklist
This checklist has been prepared by CKA Group. It is intended as a guide to assist prospective homeowner to make informed decisions about the quality of a home before purchasing.
The checklist should be read in conjunction with the Home Renovation Guide and Home Renovation Cost Indicator, available on the CKA Group website.
Contact the CKA Group at 03 8658 4000 to discuss your renovation project or the potential to improve an aging home.
For many, the family home is the biggest investment they make. Yet, several people launch themselves blindly into purchasing a home without sufficient care taken to check the quality and condition of the property.
If you know the condition of a house, you are in a better position to decide whether it’s worth making an offer. If the condition of the home is poor, you may be able to negotiate a lower price. Additionally, you’ll have information as to urgent or necessary repairs that may be required once you move in. Arming yourself with a basic knowledge of the condition of the home could also save you from buying a “lemon” and give you the comfort that you made the right decision to keep looking for the perfect home.
You may choose to have a professional inspection; however, if you have a “do-it-yourself” mindset, you might find this checklist handy.
What you will need:
- a ladder
- a long shank screwdriver
- a good torch
- a power point tester (available inexpensively from most large hardware stores)
It is also advisable to wear old clothes and practical shoes.
The Inspection – What to Look for
OUTSIDE
THE GARDEN:

Oleander plants can be toxic
- Check the condition of fences and gates. Examine the base of gates posts and fence posts, the bottom “plinth board” and at the junction of rails and posts for rot.
- Look for large trees too close to the house. Large trees can cause excessive movement underground, which can cause cracks to occur within the home, particularly in brick or brick veneer homes with timber floors.
- Make sure the water run-off from the garden doesn’t flow, or pond, underneath the house, causing damp conditions, which can deteriorate timber structures more quickly.
- It is worthwhile noting the location of potentially toxic trees and shrubs, such as Rhus or Oleanders (pictured), which can be harmful to children or pets.
OUT-BUILDINGS:
- Check the structural condition and water-tightness of rooms and walls of garages and sheds. Look for water stains on timbers and metal sheeting.
- Look for fire hazards, loose or broken power points and badly wired electrical fittings.
OUTSIDE WALLS:

- Carefully inspect the external walls to ensure that they are straight. In timber houses, sagging weatherboards could mean timber stumps have rotted, or concrete stumps or brick piers have subsided. Minor cracking in the brickwork of older houses can generally be ignored, but cracks wider that 5mm or bowed brick walls could mean the footings have subsided and an expensive under-pinning job may be required.
- Check for rotten weatherboards, window frames, doors and verandah posts.
- Thoroughly check the condition of mortar between bricks. If mortar has been eroded away, it should be cleaned out and re-capped by a bricklayer. Different coloured mortar indicates a repaired brick wall, which could either be a repair or a patch-up. Where houses are brick clad, make sure there are plenty of sub-floor ventilators (see image, right as an example) beneath the floors. Inadequate ventilation and dampness are the major causes of many sub-floor problems.
- Look for buckled, badly fitted or water stained eaves, which may be an indicate gutter or drainage problems.
ON THE ROOF:
- Lean your ladder against the guttering and look for a wavy roof line. This may indicate a structural problem (see “roof space”). Never try to walk on the roof.
- Look for broken roof tiles and loose ridge and valley tiles allowing bird and possum entry as well as water leaks.
- Check that corrugated iron sheets are in good condition and well nailed down.
- Ensure that valley and eaves guttering are free from holes and rust. Even small holes can create damaging leaks. Extensive replacement is often necessary.
- Make sure the flues and chimneys are structurally safe and the flashing around them is secure against water penetration.
UNDER TIMBER FLOORS:
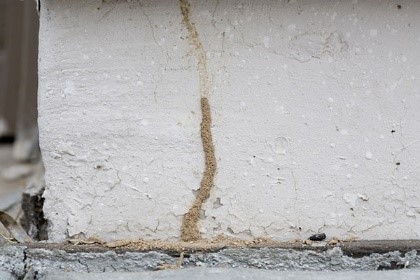
An example of a termite “shelter tube”
- Look under the floor for props or bricks holding up the floor instead of stumps, piers or dwarf walls.
- Check for sinking stumps or brick piers or whether excessive wedging has occurred between these structural supports and the floor bearers. Restumping or replacement of floors is very expensive.
- With timber stumps, look for stumps with the highest exposed water stain and dig away up to 100mm of soil below ground level. Check for rot by scraping the stump and seeing how deep any rot goes. This can indicate the approximate life expectancy of the stumps. On average, stumps last 40—120 years.
- Inspect timber framing and floors generally for rot, mould and evidence of borers or termites. Borer attack in some species of pine may be due to Anobiid borers. These will eventually destroy the timber and should be treated immediately.
- Check to see that the earth is not excessively wet. Dampness problems accompanied by inadequate ventilation encourage rot, borer and termite attack.
IN THE ROOF SPACE:
- Look for sagging roof framing, cracked or broken tiles, rusty iron roofing and leaking ridges or valleys. A defective roof can be a very costly repair item.
- Check for shoddy or damaged electrical wiring. Do not touch!
- A pungent odour or rat-like dropping could indicate the presence of vermin. Possums can damage ceilings and should be removed. (It is illegal to poison them).
- Note whether the ceiling has been insulated. In many homes, insulation is the most practical and cost effective way to make the house more energy efficient. If the ceiling is not insulated, consider what extra cost this may add to energy bills, or how much it would cost to install adequate insulation.
CONCRETE FLOORS:
- Although the underside of concrete floor slabs cannot be inspected you should check if there is any exposed perimeter to ensure that the plastic waterproofing membrane in not exposed, but protected by fibre cement or a similar covering.
INSIDE
TIMBER FLOORS:
- At regular intervals, jump lightly on the floor to detect any rotten floorboards, borer infestation or looseness in floor framing. While this test may be a guide, it by no means guarantees that any timber stumps or floorboards are in good condition.
- Check to see if the floors are level, or there are gaps between the floor and skirting. If stumps or piers are sinking, floors will always fall away from fireplaces or brick walls. This is an invaluable check in houses which have been recently renovated, but not structurally upgraded.
CONCRETE FLOORS:
- Look for signs of dampness, such as lifting or buckling floor tiles and rotten carpet. Dampness in concrete slabs can be hard to trace and expensive to remedy.
- Ducted heating systems under concrete floors can be susceptible to water leaks. Lift the floor heating vents and check for evidence of water or rusted ductwork. Water penetration can render the heating system entirely useless.
- Hairline cracks in concrete floors are normal, but if cracks are more than two millimetres wide, it could indicate a significant structural problem.
WALLS:
- Check that walls are straight and true. Deviations could be either warped framing timbers, or the onset of structural problems. Re-check footing or stumps.
- Look for cracks and general movement and be particularly wary of freshly painted or wallpapered areas. In these cases, look for evidence of recently filled cracks, a sign of sub-floor structural problems.
- Carefully inspect brick walls for signs of dampness. This may be evident through the presence of white or brownish deposits. Rising damp may also cause skirting and architraves to rot and paint and wallpaper to lift. Rising dampness or salt damp can be particularly expensive problems to cure.
- Tap solid brick walls for a hollow sound or a change in tone. Both could indicate a plastered or rendered-over patch up of a significant rising damp problem.
- Look for cracks beside chimneys and look for doorways and windows that aren’t quite square, or are jamming. These usually indicate structural instability.
- Lightly tap walls and tiled surfaces with the handle of your screwdriver. A hollow sound could mean loose plaster or tiles.
CEILINGS:
- Check that ceilings are straight and true, and look for cracks or signs of movement at the cornices. These could indicate roof or wall-framing problems.
- Look for water stains and mould growth, which could indicate excessive condensation or roof leaks.
WINDOW AND VENTILATORS:
- Make sure that the windows can be opened, and check for broken window panes. The rope sash cords in older double hung windows may be broken or need replacing.
- Check for excessive condensation and mould growth on windows and walls. Locate the source of musty smells. The causes could be: inadequate ventilation, sub-floor dampness, roof leaks, lack of insulation or often a combination of these.
ELECTRICAL SYSTEMS:
- Check that light switches and power points work
- Test power points with the power point tester. This will indicate outlets that are incorrectly wired. The most common problem is power points that are not earthed, often a sign of illegal home handyman wiring.
- Look for signs of burns around switches, fittings and fuses.
- Wiring in many older homes is quite sound, provided that it has been left intact. If additional power points or lights are required, the entire electrical system may need replacing.
- If you are at all in doubt about the condition of the electrical system, you should have it checked by an electrician.
PLUMBING SYSTEMS:
- Check all plumbing fittings, such as tapware and drainage pipes, for cracks or leaks.
- Test the water pressure in hot and cold taps. It is worthwhile turning on several taps simultaneously to ascertain if there is a drop in pressure.
- Partially fill the bath or laundry tub and observe whether or not the water drains away properly. A sluggish flow or gurgling in the pipes could indicate that the sewer drains are damaged or blocked.
- Look for damp ground around the vicinity of the drains, which could be caused by crack or leaks in pipes, needing replacement.
- Check for dampness and soft soil where downpipes meet the ground. Downpipes may not have been plumbed to stormwater by they need to be, to avoid structural and dampness problems.
RENOVATIONS & EXTENSIONS
If the house has recently been renovated or if extensions have been carried out, check with the local council to ensure that a building permit was obtained. Illegal alterations could become your responsibility, particularly if they contravene the building regulations.
If you are buying with a view of doing extensions in the future, check out our DIY Home Improvement Guide and our Home Renovation Cost Indicator Guide.
To view or print this article in PDF, CLICK HERE.